Quick Start
Get started with YAT in 5 minutes, create your first tunnel
📋 Prerequisites
- ✅ macOS 10.15+ / Windows 10+ / Linux (Ubuntu 18.04+)
- ✅ Network connection
- ✅ YAT account (supports GitHub/Google login)
Step 1: Install YAT Client
macOS
- Download the
.dmgpackage - Double-click to open, drag to Applications folder
- Launch from Launchpad or Applications folder
⚠️ First Launch: If prompted "Cannot verify developer", go to System Settings > Privacy & Security > Open Anyway
Windows
- Download the
.exeinstaller - Double-click to run the installation wizard
- Follow prompts to complete installation
Linux
# Download AppImage
chmod +x yat-*.AppImage
./yat-*.AppImageVerify Installation
After launching, you should see YAT's main interface:
📸
YAT Main Interface - First Launch
Description: Shows welcome page, login button, feature introduction
Step 2: Login
Login Methods
YAT supports the following login methods:
- GitHub Login (Recommended)
- Google Login
- Email Registration (Coming soon)
Login Process
- Click the Login button
- Select login method
- Authorize YAT to access your account
- Complete login
Description: Shows GitHub/Google login buttons
After Login
After successful login, you'll enter the main interface where you can see:
- 📊 Dashboard - Overview statistics
- 🔌 Tunnels - Tunnel management
- 🖥️ Edges - Edge server management
- 🧩 Apps - Apps and extensions
- ⚙️ Settings - Settings
Step 3: Subscribe to Edge Server
Edge servers are YAT network's relay nodes. For new users, we recommend subscribing to shared Edge servers first.
Subscribe to Shared Edge
- Click Edges in the left navigation
- Switch to Marketplace tab
- Select an available Edge server
- Click Subscribe button
📸
Edge Marketplace Page
Description: Shows subscribable Edge list, subscribe button
Verify Subscription
After successful subscription, the Edge will appear in My tab with status Online.
Step 4: Create Your First Tunnel
Now let's create an HTTP tunnel to expose a local service to the public network.
Prepare Local Service
If you don't have a local service, quickly start one:
# Start simple HTTP server with Python
python3 -m http.server 8080

# Or use Node.js
npx http-server -p 8080Visit http://localhost:8080 to confirm the service is running normally.
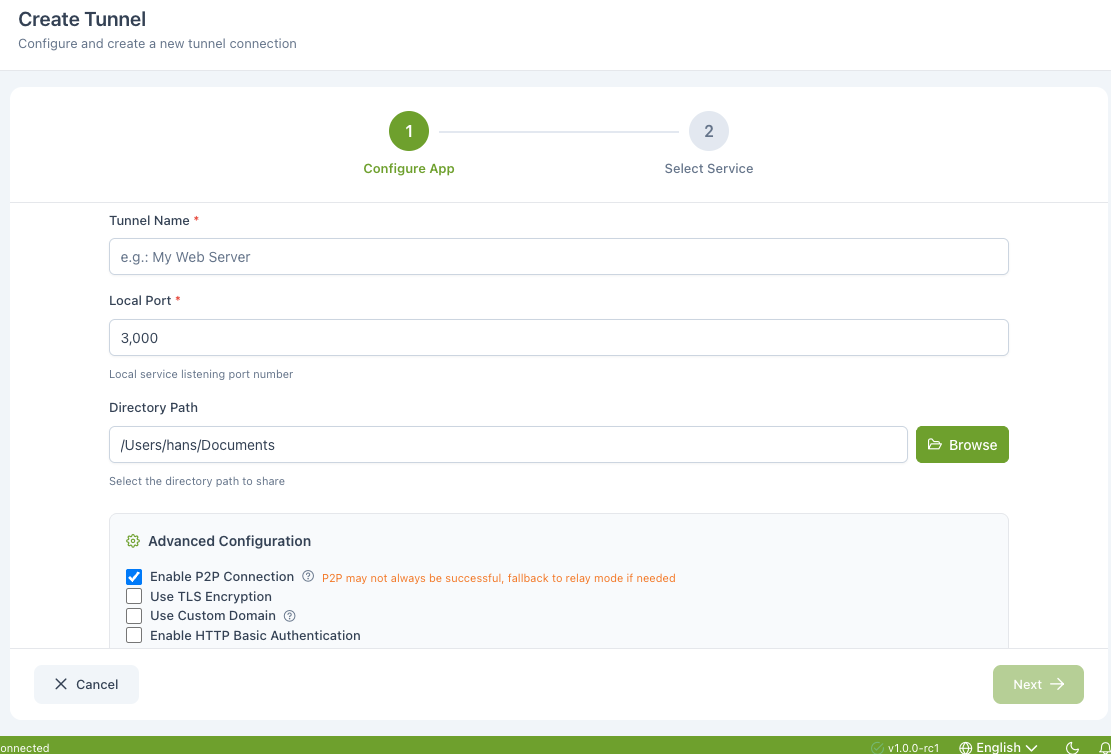
Create Tunnel
- Click Tunnels in the left navigation
- Click Create Tunnel button
- Select HTTP Proxy app
- Select your subscribed Edge server
- Fill in configuration:
- Tunnel Name: My Test Service
- Local Port: 8080
- Sharing Settings: Exclusive (Recommended)
- Click Create
Create Tunnel Dialog
Description: Shows app selection, Edge selection, configuration form
Creation Successful
After successful creation, the tunnel will appear in the tunnel list with status Inactive.
Step 5: Start Tunnel
- Find the newly created tunnel card
- Click Start button
- Wait for status to change to Running
Tunnel Startup Process
Description: Shows start button, status changes, loading animation
Start Successful
After successful start, the tunnel card will display:
- ✅ Status: Running (green)
- 🌐 Remote Address:
https://xxx.myroxy.dev - 📊 Traffic statistics
Step 6: Access Remote Service
Get Remote Address
On the tunnel card, find the Remote Address section:
https://abc123-def456.myroxy.devTest Access
- Copy the remote address
- Open in browser
- You should see the same content as
http://localhost:8080
📸
Browser Accessing Remote Address
Description: Shows webpage accessed through YAT tunnel
🎉 Congratulations!
You've successfully created and started your first YAT tunnel!
🎯 5-Minute Experience Checklist
- [x] Install YAT client
- [x] Register and login
- [x] Subscribe to Edge server
- [x] Create HTTP tunnel
- [x] Start tunnel
- [x] Access remote service
🚀 Next Steps
Now that you've experienced YAT's basic features, explore more advanced features:
Recommended Learning Path
- Tunnel Management - Learn to create TCP/UDP tunnels, tunnel sharing, etc.
- Edge Server Management - Deploy your own Edge server
- Apps and Extensions - Use ARD remote desktop
Common Operations Quick Reference
| Operation | Location | Description |
|---|---|---|
| Create Tunnel | Tunnels > Create Tunnel | Select app and Edge |
| Start/Stop | Tunnel Card > Button | Control tunnel status |
| View Details | Tunnel Card > View Details | View channels, domains, etc. |
| Delete Tunnel | Tunnel Card > Delete | Permanently delete tunnel |
| Subscribe Edge | Edges > Marketplace > Subscribe | Subscribe to shared Edge |
| Deploy Edge | Edges > Create | Deploy your own Edge |
💡 FAQ
Q: Prompt "No available Edge" when creating tunnel
Reason: You haven't subscribed to any Edge server.
Solution: Go to Edges > Marketplace, subscribe to a shared Edge.
Q: Tunnel fails to start
Possible Reasons:
- Edge server offline
- Local port occupied
- Network connection issue
Solution:
- Check Edge status (should be online)
- Confirm local port is accessible
- Check error message, or refer to FAQ
Q: Remote address inaccessible
Checklist:
- [ ] Is tunnel status "Running"
- [ ] Is local service running normally
- [ ] Does browser show certificate error (ignore and continue)
- [ ] Is Edge server online
📚 Related Documentation
- What is YAT - Learn YAT's core features
- Tunnel Management - Deep dive into tunnel management
- Edge Server Management - Deploy and manage Edge
- FAQ - Solve common issues
YAT Team - Making intranet penetration simpler